
Affiliate disclosure: this article contains affiliate links. If you buy through them, DrawBySight may earn a commission at no extra cost to you. Read our affiliate disclosure.
Grid method drawing is the simplest way to copy a photo accurately, and to make a drawing larger or smaller than the original, without tracing. You draw a grid of equal squares over your reference photo, draw a matching grid on your paper, then copy what you see one square at a time. Because each square is a small, abstract puzzle, your brain stops “correcting” what it sees, and proportions come out far more accurately than drawing the whole face freehand.
This guide covers the grid method step by step, how big your grid squares should be, how to enlarge a 4×6 photo for an 8×10 drawing (a very common question with a slightly tricky answer), how to erase grid lines cleanly, and whether using a grid is cheating.
Grid method drawing in brief
- Match the proportions first. The photo and the paper must have the same width-to-height ratio, or the drawing will be distorted.
- Scale the grid, not the drawing. If the paper is twice the size of the photo, the squares on the paper are twice the size too.
- Use a light, hard pencil (2H or harder) for the grid on paper so it erases cleanly.
- Smaller squares for detail, larger squares for simple shapes. 1-inch squares on a 4×5 inch reference is a good starting point.
- A 4×6 photo does not scale evenly to 8×10. Crop it to 4×5 first, then double it.
What you need for the grid method
| Tool | What it’s for |
|---|---|
| Ruler (a clear grid ruler is easiest) | Measuring and drawing straight, even grid lines |
| 2H or 4H pencil | A light grid on the drawing paper that erases cleanly |
| HB pencil | Copying the outlines square by square |
| Kneaded eraser | Lifting grid lines without damaging the paper |
| Printed reference or a clear acetate sheet | Drawing the grid on the photo, or over it |
| Fine marker | Drawing the grid on the printout or acetate |
If you prefer to keep your photo clean, draw the grid on a sheet of clear acetate and lay it over the print, or use a phone app or photo editor that overlays a grid on the image.
How to use the grid method step by step
Step 1: Choose and prepare your reference
Pick a sharp photo with clear lights and shadows. Decide on the final size of your drawing, then crop the photo so that its proportions match your paper. This step is where most problems start, so it gets its own section below.
Step 2: Draw the grid on the photo
On your print or acetate, draw a grid of equal squares starting from one corner. Number the columns along the top and letter the rows down the side. Labelling squares stops you losing your place, which is very easy to do in areas like hair or background where many squares look alike.
Step 3: Draw a matching grid on the paper
On the drawing paper, draw the same number of rows and columns with a 2H or 4H pencil and very light pressure. If your drawing is twice the size of the photo, each square is twice the size. Label it in the same way, lightly, outside the drawing area.
Step 4: Copy the contents one square at a time
With an HB, copy the lines and shapes inside each square. Pay attention to where a line enters and leaves each square: if the edge of the jaw crosses the right side of square C4 one third of the way down, it must cross it at the same point on your paper. Work on the outlines of the main shapes and the edges of shadows, not shading.
It often helps to turn the reference and the drawing upside down, or cover all but the square you’re working on. Both tricks stop your brain from drawing what it expects an eye or a nose to look like.
Step 5: Check, then remove the grid
When all the outlines are in, compare the drawing with the photo as a whole. Fix any proportions that look off, then erase the grid lines before you begin shading. See “How to erase grid lines” below.
Step 6: Shade
Now shade as normal. Because the outlines are accurate, you can focus entirely on values. If you’re drawing a portrait, our guides on how to shade a face and how to draw a realistic eye take it from here.
How to enlarge a 4×6 photo for an 8×10 drawing
This is one of the most common grid method questions, and the short answer is that a 4×6 photo doesn’t scale evenly to 8×10 because the proportions are different.
- A 4×6 photo has a ratio of 2:3.
- An 8×10 sheet has a ratio of 4:5.
- If you double the 4×6 photo, you get 8×12, which is 2 inches too tall for 8×10 paper.
You have three options:
- Crop the photo to 4×5, then double it. Trim half an inch off the top and bottom of the 4×6 photo (or a full inch from one end, depending on the composition). A 4×5 crop doubled is exactly 8×10. This is usually the best option for a portrait, because there is often spare background above the head.
- Scale to fit the height and leave margins. Scale the 4×6 photo so its 6-inch side becomes 10 inches. The factor is 10 ÷ 6, about 1.67, which makes the drawing about 6.67 by 10 inches, leaving a margin of roughly 0.67 inches on each side of 8×10 paper. The grid squares get awkward to measure, though.
- Use larger paper. Draw at 8×12 on a larger sheet and trim or mat it to fit.
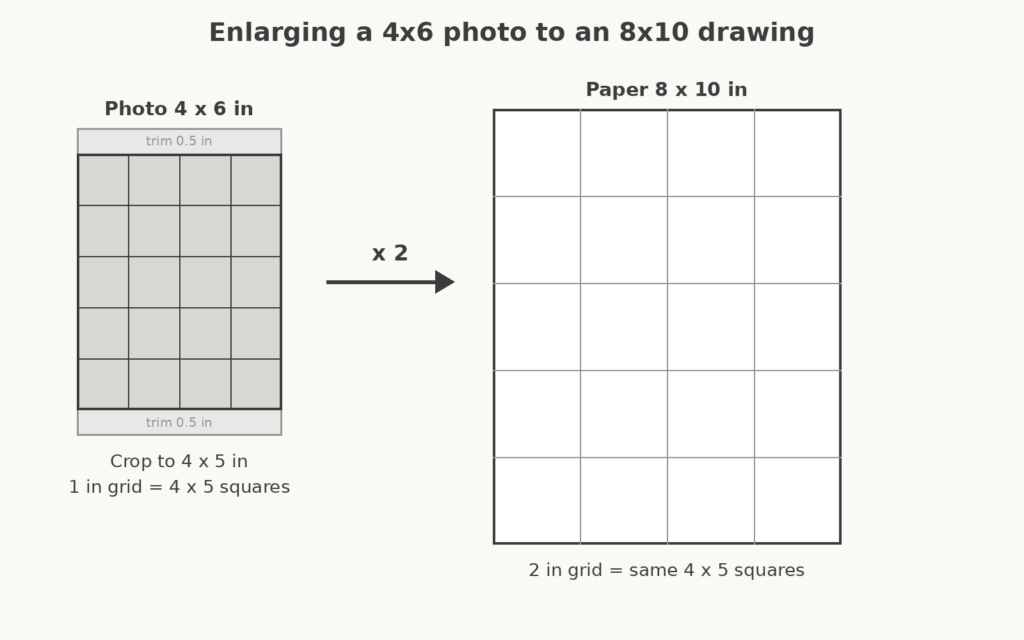
For option 1, the grid works out neatly:
| Reference (cropped 4×5) | Drawing (8×10) |
|---|---|
| 1-inch squares: 4 columns x 5 rows | 2-inch squares: 4 columns x 5 rows |
| 0.5-inch squares: 8 columns x 10 rows | 1-inch squares: 8 columns x 10 rows |
The second row is better for portraits, because smaller squares give you more reference points around the features.
How to scale up a drawing to any size
The rule works for any enlargement: divide the drawing size by the photo size to get the scale factor, then multiply your grid squares by it. For example, to scale a 5×7 photo up to 10×14, the factor is 2, so 1-inch squares become 2-inch squares. Always check that the factor is the same for the width and the height. If it isn’t, crop the reference first.
You can also skip the maths by printing the reference at exactly the size you want to draw. Then the grids are identical, which makes copying even easier, and you can measure directly from the print.
How big should grid squares be?
There’s no single right answer, but these guidelines work well:
- For a portrait on 8×10 paper, 1-inch squares (8 x 10 squares) are a good balance between accuracy and the number of lines to erase.
- For fine detail like eyes, you can subdivide just the squares around the features into quarters. You don’t need small squares across the whole drawing.
- For large drawings or simple subjects, 2-inch squares may be enough.
- Squares that are too small mean dozens of lines to erase and can dent the paper; squares that are too large leave too much guesswork inside each one.
Some artists also draw diagonal lines through each square, from corner to corner, which gives extra reference points. This is useful for faces, where small errors are noticeable.
How to erase grid lines
Grid lines are easiest to remove if you plan for it from the start:
- Draw them with a 2H or 4H and almost no pressure. Hard pressure dents the paper, and the dents show up as white lines once you shade over them.
- Lift, don’t scrub. Press a kneaded eraser onto the line and lift it away. Scrubbing with a hard eraser can roughen the paper surface and smear your outlines.
- Erase before you shade, keeping only your outlines, or erase square by square as you shade each area.
- Keep the outlines light too. Once the grid is gone, the outlines are your only guide, but they should still be faint enough to disappear under shading.
If dents from a grid are already visible in shading, there’s no perfect fix, but working dark tones over them with a soft pencil held at a low angle can reduce how much they show.
Is using a grid cheating?
No. The grid method has been used by artists for centuries to transfer and enlarge compositions, and it’s still widely used by portrait and mural artists today. It doesn’t draw anything for you; it simply helps you place shapes accurately so you can concentrate on shading, which is where most of the skill and time in a realistic drawing goes.
That said, freehand drawing builds observational skills that a grid doesn’t. A good approach for learners is to use the grid for finished pieces and practise freehand sketches alongside them. Over time, you’ll find you need fewer squares.
Common grid method drawing mistakes
| Mistake | Result | Fix |
|---|---|---|
| Photo and paper have different proportions | Faces look stretched or squashed | Crop the reference to the paper’s ratio before gridding |
| Grid drawn too dark | Lines show through the finished drawing | Use a 2H or 4H, light pressure, and lift with a kneaded eraser |
| Losing your place | Features copied into the wrong square | Label rows and columns on both grids |
| Copying whole features at once | Proportion errors creep back in | Copy only what is inside one square at a time |
| Squares not perfectly square | Gradual distortion across the drawing | Measure from the edges each time, not from the last line |
Alternatives to drawing a grid
If you’d rather avoid grids, you can use proportional dividers, a light box or transfer paper. Some courses also provide ready-made outline templates. For example, Pencil Drawing Made Easy includes downloadable PDF templates for each lesson so you can transfer the outlines accurately without grids or proportional dividers, which lets beginners spend their time on shading. You can read more in our Pencil Drawing Made Easy review, or compare other options in our guide to the best online drawing courses.
Frequently asked questions
How do you enlarge a 4×6 photo for an 8×10 drawing?
Crop the 4×6 photo to 4×5 inches, then double everything. Draw a 1-inch grid on the cropped photo and a 2-inch grid on the 8×10 paper, or 0.5-inch and 1-inch squares for more accuracy. A straight 2x enlargement of the full 4×6 photo would be 8×12, which won’t fit.
How big should the squares be for the grid method?
For a portrait on 8×10 paper, 1-inch squares are a good starting point. Subdivide only the squares around detailed features like the eyes. Smaller squares give more accuracy but mean more lines to erase.
Is using the grid method cheating?
No. It’s a traditional technique for accurately transferring and enlarging an image. The shading, values and finish are still entirely up to you. Practising freehand alongside it will build your observational skills.
How do you get rid of grid lines in a drawing?
Draw the grid lightly with a hard pencil like 2H or 4H, then lift the lines with a kneaded eraser before shading, without scrubbing. Heavy pressure dents the paper and leaves white lines that are hard to remove.
Can you use the grid method to make a drawing smaller?
Yes. It works the same way in reverse. If your drawing is half the size of the photo, make the squares on your paper half the size of the squares on the reference.